Mid-summer 2015 was marked by the release of the widely anticipated Windows 10 operating system. Consumers were able to get it by downloading a free update. Which is offered by every computer with Windows 7 and 8.1 installed. The new version has identified itself as the most reliable. But like any mechanism, it can sooner or later fail. Older versions offered different ways to fix errors. Windows 10 was no exception. How to return it to working condition or correct errors is described in this article.
The operating system itself offers users a wide choice of recovery methods. First, you will need to diagnose the suspected problem with Windows 10. For example, if the computer does not boot or freezes a lot, then you should use the troubleshooting tools that are present on the installation disks. If the operating system still loads, but does not work well or often freezes, then you can use the system itself to return to working condition.
There are three main methods for restoring system functionality, each of which is suitable in different situations based on the diagnosis of the problem itself. All of them are known and are similar to the methods that were in older versions of Windows:
- return to original parameters;
- restore point;
- return to working condition using an OS image;
- Windows 10 boot disk;
Correction using the "Restore Point" method
The most common method that does not require much knowledge in information technology is to use restore points. To use this method, the user needs to click on the notification tab, then select the following items: “All settings” - “Update and security” - “Recovery”.
You can also get to this menu even without completely loading the OS. To do this, after the welcome screen appears, where the computer prompts you to enter a password, you need to click on the power icon and hold down the Shift key. After a couple of seconds, a window will appear in which you need to select the “Diagnostics” item and go to the “Reset to original state” tab.
To start fixing problems in Windows 10, in the “Restore to original state” item, click on the “Start” button. After this, a dialog box will appear that will offer two options for reinstalling the OS:
Method by deleting all files and completely reinstalling the OS
This method deletes all old owner data and Windows 10 settings. After which all necessary drivers and the operating system itself are installed. All actions occur automatically - this prevents errors that may occur due to the human factor.
The disadvantage of this method is that it will not be able to resurrect the OS if there is damage on the hard drive. This will require other methods.
OS with storage of personal data
The method returns the computer to its original form, but at the same time retains all the owner’s data. During this correction, files stored in the users folder (sections such as “Documents”, “Images”, “Downloads”, etc.) are not formatted. But at the same time, all programs that were previously installed will be deleted. 
Restore point
This method has been used for many years by Windows. The system points for fixing a non-working OS are known to many, but few know how to check or enable them. They help the computer owner get things working in case of unsuccessful installation of a driver or other programs that lead to Windows 10 failure.
To make sure that the program creates such points on a schedule, the user needs to go to the “System Setup and Recovery” menu. To do this, right-click on the “Start” button and select the following items one by one: “Control Panel” – “Recovery” – “System recovery settings”. 
Typically, point creation occurs automatically on a schedule, and this feature is enabled by default. But the owner can always change most of the parameters independently by clicking on the “Customize” button.
All recovery points are created automatically when any important software settings and parameters are changed, as well as various services, program installations, etc. In case of experiments or other dangerous situations, the owner can create a record of the system state himself.
If Windows 10 does not work well after installing a program or driver, then by going to the appropriate item, you can return it to its original state. To do this, select the “Start system recovery” section, where the user can select the date the point was created. Having agreed to the changes, you should click the “Continue” button, after which the OS will return to the state that was saved earlier.
Creating a full Windows 10 recovery image
The developers have left a function for creating a complete OS recovery image on a hard drive (built-in or external) or on several optical DVDs.
The difference from the previously used option is that the process creates a complete reflection of the operating system, including all installed programs, necessary drivers, and individual settings that are relevant when loading the image. In the previous version, the user could only receive the OS installation file and save personal data.
It is best to create such a file immediately after the complete installation of the OS, all drivers and necessary programs, when the computer is fully configured and not cluttered with unnecessary files and applications.
To record this image, go to the “Control Panel” menu, here open the “File History” item. In the lower left part of the window, select the line “Backup system image”, then “Create a system image”. An alternative way: go to the “All Settings” menu, select “Update and Security”, then the “Backup Service” line, in the window that opens, click “Activation and Recovery (Windows 7)”, then “Create a system image”.
In the menu that appears, the user can independently indicate the path where the created file should be saved: options will be offered: to a hard drive, to a DVD drive or to a network folder, select the one you need, and you can also mark the items and partitions on the disks that need to be included in the backup copy , and which ones to remove from it. Most often, this is the section occupied by the OS itself and the software parts of the disk. 
Subsequently, the resulting file can be used to quickly return the computer to the desired state. You can launch this function from the image itself from the disk on which it is saved, or select the “Recovery” menu in the program. To do this, you need to go to the “Diagnostics” window, select the “Advanced options” line, and then “System image recovery”.
Windows 10 boot disk
Resuscitation work can be carried out either from a bootable CD/DVD disk or from a flash drive.
In older versions of Windows, a specialized disk with a set of repair utilities was used. In a modern OS, this is a full-fledged disk with Windows 10 and various recovery programs.
For security, the user can create such a disk himself using the built-in tools of Windows 10. To do this, go to the “Create a recovery disk” menu.
This feature is also useful for quickly installing the system. To do this, you need to select the item that makes a backup copy with a complete copy of all program files.
To launch such media, you need to restart the computer and first, before loading the OS, go to bootmenu and select the desired disk. Or this function can be configured in the BIOS, indicating from which media the boot will take place.
After saving the settings, the installation welcome window should appear. Here, you need to select System Restore, then the “Diagnostics” section. This will allow the user to fix the system in several ways: 
- Command line – here, you can correct errors by manually entering commands and launching various utilities. This method is suitable for advanced users.
- Restoring the OS from an image - boots from a previously saved image.
- Restore point – loaded from a previously saved system state.
- Startup Repair – Fixes any important program files that may have become corrupted.
- You can also go into the BIOS to fix or make changes to system settings.

Having such a device, the user can protect himself in many matters. An advantage can be considered the quick installation of Windows 10, with existing drivers on board.
As can already be seen from the above, Windows 10 offers a very large selection in correcting system errors. Even an inexperienced user can master them. They have the simplest and most convenient mechanism for interacting with a person.
Many may argue that there are now a large number of products on the software market aimed at fixing the OS. They also have a convenient and intuitive interface. The flexible data saving algorithm is more advanced than in the operating system itself. All this gives the green light to third-party programs. But, as a rule, they cost a lot of money. Therefore, it would be good practice for the owner to know how to revive Windows 10 using the system itself.
In contact with
Windows 10 has proven itself to be a very reliable and proven system. But even carefully designed software is not immune to the unusability of some applications, file corruption and other unpleasant moments.
In such cases, you may need to roll back the system to a time when it worked properly. This can be achieved using the built-in recovery feature in Windows 10. We'll show you how to reset your settings correctly and get your computer back up and running quickly.
When using any system recovery or repair method, it is always very important to first back up your data. This can be done using free tools that come with Windows, cloud storage, or third-party software.
While you're using your computer, Windows periodically creates a snapshot of your system (applications, data, and the OS itself) that it stores on your hard drive.
Then, when faced with a problematic situation, System Restore will allow you to revert to a previous state, so the data will be saved in the end.
The good thing about this process is that all documents, images, etc. will remain unchanged, while all applications you installed after the rollback will be deleted. When things go wrong, this is the sure way out of a difficult situation.
Important! One drawback, although quite an important one, is that you probably never turned on the save feature. Do this first, because otherwise the system will not be able to perform a restore, since it will not have saved versions.
To prevent this from happening in the future:

At least if you run into problems in the future, you'll be covered.
How to restore your system using the Settings menu
This is the simplest way:

How to restore your system using startup options
An alternative way is to start the process by restarting your computer. So you need to open:

Windows 10 will complete the process, reboot and start working fine.
Note! This method should resolve any issues you're having with your PC, but if they persist, you may want to completely format your drive and start again.
Getting back a working copy of Windows 10 using this method is not as easy as it seems. If something wrong happens to the system and other options do not work, then this is perhaps the only way. The above solutions are only suitable if the device starts without errors and generally works normally. Sometimes the problem is so serious that the computer is unable to even start, which means you will not be able to begin Windows recovery.

All you can do is start the system in safe mode. This will give you access to the command line, which will help you restore the previous copy using simple commands.
Let's figure out how to return the system to a working state using the command line.
Step 1. Start your computer and hold F8 until the Windows Advanced Options menu appears. Some laptop models (such as Lenovo) require you to hold down the Fn key.

Step 2. Select "Safe Mode using Command Prompt" and then press Enter.

Note! If your computer boots without problems, press Win + R and type cmd in the Run box.
Step 3. If necessary, log in using an administrator account. Once the command prompt appears, type the command rstrui.exe and then press Enter.

Note! This command is slightly different depending on the system version.
Step 4. Next, the Windows Recovery Wizard will open. Use the recommended backup or choose one yourself, then click Next. Follow the instructions below to complete the recovery.
However, this method is suitable for advanced users, as beginners may find it difficult. Sometimes you receive an error message: "Windows cannot find a system image on this computer." It's better to take advantage
Video - How to run System Restore on Windows 10
This article contains the most common errors when starting Windows 10, as well as how to fix them. We hope this information will make life a little easier for those who switched to a new version of the system and suddenly found themselves between a rock and a hard place.
1. Windows 10: “The computer is not starting correctly”
The first common problem when starting Windows 10 is that the system reports some critical error ( CRITICAL_PROCESS_DIED, INACCESSIBLE_BOOT_DEVICE), and then displays a blue "Automatic Repair" screen with the text .
 Automatic recovery: the computer did not start correctly
 The cause of this error, in most cases, is damage and deletion of system files or registry entries. This may be caused by installing and uninstalling programs, or by antivirus programs or Windows registry cleaning utilities.
The solution to the problem is to repair files and registry entries that are damaged:
- Click on the button Extra options on the blue screen, select Troubleshooting> Extra options > Boot Options.
- Click Reboot.
- In the window Boot Options Press the F6 key or number 6 on the numeric keypad to launch Safe Mode with command line support.
- The computer will restart in Safe Mode and Command Prompt will automatically open. In it enter:
The computer will restart and after that Windows will start in normal mode.
2. Windows 10 does not load beyond the logo
Another known problem is that the system boots all the way to the Windows logo, after which the computer randomly shuts down. The reason for this error is also damage to system files, however, unlike the first case, the damage is so serious that the system cannot start the recovery itself.
In this case, you will have to create a Windows emergency recovery disk on another Windows 10 PC:
- In the Windows 10 Control Panel, find and select Recovery > Creating a recovery disc.
- In the window that appears, set the parameter Back up system files to a recovery drive and press Dalley.
- Connect an empty USB drive to your computer. Select it in the recovery disk creation window and click Next > Create.Wait until the files are copied and press Ready.
- Remove the USB drive from your computer, connect it to the one that won't run Windows 10, and enable booting from it in the BIOS.
- The Windows Recovery Environment will launch. You need to select Restoring a system image, or point Command line, and then enter the commands from the instructions for solving the first problem.
 Windows Recovery Environment
 You can also run the system recovery environment from the disk from which you installed Windows. To do this, you need to boot from the installation disk, in the bootloader instead Install press System Restore. In the menu that appears, select Troubleshooting> Extra options. The same options window above will open.
After recovery, the computer will restart. Reset the BIOS to boot from the hard drive and the system should start correctly.
3. Errors “Boot Failure” and “An operating system wasn’t found”
In some cases, when starting Windows 10, instead of loading the operating system, a black screen appears with one of two errors:
- Boot failure. Reboot and Select Proper Boot device or insert boot media in selected boot device.
- An operating system wasn’t found. Try disconnecting any drives that don’t contain an operating system. Press Ctrl+Alt+Del to restart.
There can also be two reasons for this error:
- Incorrect boot device order in BIOS or UEFI. Make sure you are booting from the exact drive where Windows 10 is installed.
- Damage to the system bootloader. In this case, you will also need an installation disk or a Windows 10 emergency recovery disk. After booting from it, in the recovery environment you need to select Startup Recovery and let the bootloader files be overwritten.
The problem may also be hardware damage to the hard drive from which the boot is made.
 Boot Failure Error
 4. Windows 10 won't start: black screen
A common error when starting Windows 10 is a black screen with no signs of loading the desktop, with or without the cursor frozen on the screen. This often happens as a result of incorrect installation of any drivers: after rebooting, the computer works, but the OS does not load.

In most cases, the solution to the problem lies in a system rollback. To do this, you will also need an installation disk or a Windows 10 emergency recovery disk. After booting from it, in the recovery environment you can try selecting System Restore.
This will roll back the system to the state before the problem occurred. The system will prompt you to select a restore point to which to rollback, and after confirmation it will perform it. As a rule, after a reboot the black screen disappears.

5. Windows 10 takes a long time to load when turned on
There is a situation when Windows 10 does not load, the waiting icon is spinning, and that’s it. In fact, most likely, nothing bad is happening - the system is simply installing the updates that it downloaded the last time you used the computer.
In this situation, the best thing to do is just wait. This condition may last for several hours depending on the number and volume of downloaded updates. It is recommended not to turn off the computer, but to leave it in the boot state for 1-2 hours.
To prevent this error from happening again when starting Windows 10, you can set your computer to update on a schedule, and the system will not download updates without your knowledge. Read about how to edit update policies in our.
Hello.
Folk wisdom: There are two types of people - those who do not yet make backups, and there are those who already do them.
Needless to say, a backup created on time can save a lot of nerves, time and data. In general, Windows 10 (as far as I have become familiar with it) is a fairly “stable” system, at least in comparison with Windows XP, and it is much more difficult to “kill” it with your incompetent actions. But still...
In this article I want to dwell on the most common questions regarding Windows recovery, creating checkpoints and other issues. The article will be useful for those who are simply thinking about what to do if Windows “flies” tomorrow, and for those for whom something has stopped working (errors and crashes have begun to appear), and for those who no longer boot Windows and he wants to get his computer working again. So, I will consider all the questions in order.
How to set up the creation of system restore points
Important note: I don’t know why, but in Windows 10, by default, the function of automatically creating checkpoints (to which you can rollback Windows) is disabled! Therefore, I think that the first step in an article of this kind is to show how to enable this function. What’s strange is that before this, in Windows 7, 8, this function was always enabled!
Actions in order
1) First we open Windows control panel, go to the section " System and safety", then open the “System” section (see screenshot below).

System and Security / Windows 10

3) After, you need to select the system drive (on which Windows is installed - it is marked with an icon) - usually this is " local drive C:\ (system)", and click the "Configure" button.

- switch the slider position to " Enable system protection";
- move the slider to the right - we determine the place, which will be allocated for recovery points;
- save the settings (clearly shown in the photo below).

Now system protection is enabled, Windows will make backups from time to time. By the way, the more space on your hard drive you allocate for backups, the more points you will have. As soon as the space is used up, each new point will overwrite the old one...
Creating a checkpoint manually
By the way, immediately after enabling automatic creation of points, I recommend creating a point manually (especially if everything is working as it should for you so far :)).
To do this, click the "Create" button, the tab is still the same "" (by the way, this button has become active (previously it was impossible to click on it)).


Creating a restore point
After which, Windows will “think” for a minute or two, and a checkpoint will be created (by the way, Windows will notify you about this in a separate window). Actually, that’s all for the sim about “manual” work...
Note! I recommend creating a restore point manually whenever you are going to change drivers (for example), or perform any actions with the system registry.
Running recovery from Windows
How to open the recovery window (option 1)
Open the Windows Control Panel at the following address: Control Panel\System and Security\System

Then in the window that opens, click the "Restore" button (shown in the screenshot below).

After which, the "" window should appear. Windows will warn you that this operation will not affect your documents, but drivers and programs installed before creating the restore point will be deleted. Click next...

Afterwards a window with recovery points will appear. Now you need to select the desired point and click next.
Selecting a restore point
By default, Windows selects the most recent (i.e. most recent) point and prompts you to agree and click next. The last point is not always the solution to the problem. You need to select the point at which Windows was working normally for you. You can navigate by the date the point was created and its description.
Note:
- some points may be marked as "critical". There is nothing wrong with this; usually, they are created during a system update;
- If you select a specific point and click the "Search for affected programs" button, you can find out which programs will be changed when you roll back the system. For example, you will find out which programs will not work after a rollback - i.e. they will have to be reinstalled.

The last step is to agree and confirm to roll back the system to the previously created restore point. The computer will then restart and the changes will take effect.

System Restore: Confirm Rollback
Second way to open the recovery window
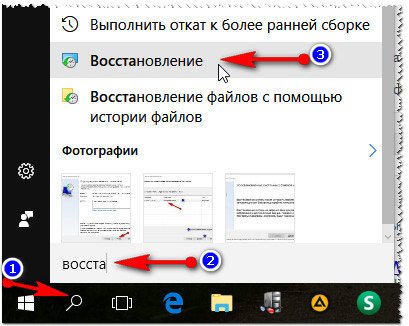
There is another faster and easier way to open the recovery window in Windows 10. To do this:
- open the search window (the “magnifying glass” icon is located next to the START button);
- enter the word “recovery” into the search bar (most likely, you won’t have to enter the entire word);
- Among the results found, open the one you need (each step is illustrated in the screenshot below).
How to roll back Windows 10 to a restore point if your computer won't boot
It’s good when Windows at least boots and you can normally open the control panel, the security section and enable the rollback function. And when does it not load? In this case, you need an installation DVD or flash drive. In my article I will focus on the second :). So, first things first...
Preparing and creating a bootable USB flash drive (if you don’t have one)
In general, I advise more than once, but it is better to use the flash drive with which you installed Windows - do nothing, save it and have it in reserve. Such a flash drive will help you out more than once. If your Windows won't boot and you don't have such a flash drive, you'll have to ask a friend or neighbor for help (if you don't have a second PC/laptop).
Remark! In order not to repeat myself (especially since the topic is extensive), I recommend that you read the following article on my website:. The article provides various options for creating bootable flash drives: Windows Xp/7/8/10, UEFI, multiboot, etc.
BIOS settings. Selecting boot media (i.e. “our” flash drive)
To boot from the installation USB flash drive with Windows, you need to configure the BIOS accordingly. In general, there is nothing complicated in setting up the BIOS (in terms of changing the boot order). Rather, the problem often lies in an incorrectly written bootable media.
In general, in my opinion, it is much more convenient to use a special boot menu - Boot Menu (English title). It can be called up when you turn on your computer/laptop. The point is that in this menu you can select the device from which to boot the computer (without going into the BIOS at all!).
Each manufacturer has its own hotkeys for entering the Boot Menu, for example, Acer laptops have F12, Samsung laptops have Esc. Press them immediately after turning on the computer/laptop. After this, usually a special menu appears in which we must select our media (an example is shown below). An expanded list of manufacturers is also available at the link below.
Hot keys (buttons): BIOS boot menu, Boot Menu, Boot Agent, BIOS Setup. Laptops and computers -

System rollback using a restore point
If the flash drive is written correctly, the Bios is configured correctly, then the Windows installation should start. Please note that on the screen on which you will be asked to install the OS, there is a link “” at the bottom of the window, and you need to click it (see screenshot below, note: green arrow).


In additional parameters - select the very first tab " System Restore (system restore using a restore point)" (see screenshot below).

Then a standard window should open asking you to roll back the system to a previously created point.

Recovery of boot records
By the way, it is not always necessary to look for a backup point and roll back the computer to it. When Windows stops loading (suddenly, for no reason at all), it is most often due to damaged boot records.
To restore them, just go to the " Extra options" (see the previous step of the article) select the tab not "", but "" (see screenshot below: green arrow under the number 2).
Windows itself will automatically diagnose and try to restore functionality.

Addition. Even in cases where the OS tells you that the attempt to restore boot records was unsuccessful, try rebooting the computer; not once in my “practice” (despite this error), after such a procedure, Windows booted successfully.
Creating a full system image
Windows 10 has one good backup option - creating an image of the entire system on a separate disk or DVD (you will need several, in my opinion it is better to use an external hard drive, or a second disk - if you have 2+ of them in the system).
The difference between this method and classic restore points is that this method creates a complete archive with all programs, drivers, user files, settings, shortcuts, etc. that are on the system.
Note. It makes sense to create such an image when you have everything set up and everything works well. Typically, this time comes after 2-3 days after installing Windows.
Creating an image
1) First open control Panel, then section " system and safety", then " Backup and Restore" (an example is shown in the screenshot below).


3) Now you need to specify the media on which the image will be saved. Usually, they choose an external hard drive (or a “large” flash drive of 64 GB, 128 GB, for example).

4) Here you need to indicate which disks you want to archive. Windows, by default, includes the disk on which it is installed and several system partitions. If this is not enough for you, you can include other local drives.
Note. Pay attention to the space that will be needed for archiving. Windows will show you the free space on your media and the required backup space. When selecting several more local drives, the required space for archiving will increase in proportion to the selected drives.

Using an image. When you start having “problems” with Windows 10, you can quickly and easily roll it back completely to its previous state using this image. To start recovery from such an image, there are 2 ways:
- - use a recovery disk;
- - in the Windows setup program, select: Diagnostics/Advanced options/System image recovery.
Addition. By the way, you can make a complete cloning of a hard drive using third-party programs (many of them, frankly speaking, have many more options and are more convenient to use than standard Windows tools). For example, such programs are: Acronis True Image, EASEUS Disk Copy, Paragon Drive Backup Personal, etc.
We fix the functionality + clean Windows from viruses using AVZ
It's no secret that problems with Windows are often caused by viruses and adware. Often for this reason, many users want to restore their Windows OS. If you start to see advertising banners appear on your desktop, on websites (where they didn’t exist before), your browser constantly opens tabs (that you didn’t ask it to open) - most likely you have picked up adware (this “infection” is very popular now).
To get rid of all this “good” and restore the computer’s functionality, I recommend using the utility - AVZ.
AVZ
One of the best antivirus utilities, no installation required. Works with all popular versions of Windows: XP, 7, 8, 10. Main tasks solved in it:
- - removal of SpyWare and AdWare inserts, modules (more relevant than ever - advertisements and other “good” constantly pop up in browsers);
- - search and elimination of Dialer (Trojan.Dialer);
- - neutralization of Trojan programs;
- - closing holes (BackDoor);
- - removal of network and mail worms;
- - neutralization: TrojanSpy, TrojanDownloader, TrojanDropper, etc.
In addition to neutralizing viruses, this program can restore system settings, close some “holes” by setting optimal parameters. Let's get down to business :).
1) Virus check
This is the first place to start working with AVZ. Even if you have an antivirus installed, it will still be a good idea to run your AVZ computer. The fact is that this antivirus utility “sees” and finds a lot of “good” that ordinary antiviruses miss.
To scan your computer for viruses, run AVZ, select the drives (be sure to select the system drive) and click the START button. Fortunately, scanning is quite fast (relative to third-party programs of a similar kind).

The second thing I recommend is to set the optimal settings (it’s no secret that not all default settings in Windows provide the optimal level of security). So, AVZ finds such problematic settings and offers you to fix them (the program fixes them itself automatically).
To run such a wizard: go to the "File" menu and select "".

Quite often, “problems” with Windows also occur due to the fact that viruses and adware change some system files, edit files, and introduce “malicious” lines into them. Because of this, for example, you see ads in your browser, even on sites where they shouldn’t be!
You can also restore many system settings in AVZ if you go to: " File/System Restore". The program will offer a whole list of various options for recovery (all options are shown in the screenshot below).

Note. If you unknowingly check all the boxes and click restore, then nothing criminal will happen, just the system settings will return to their original form, as if you had just installed Windows.
I'll wrap this up, have a good and quick fix of Windows!
If you are interested in restoring Windows 10, then you have come to the right place.
Ten, like any operating system in the Windows family, is prone to failures.
However, they are rarely fatal and irreversible, since the system contains powerful recovery mechanisms.
Let's figure out how to get Windows 10 back up and running without using third-party programs.
System Restore
This option will help fix errors that appeared after installing software, Windows updates, changes in the registry, and similar actions.
The Resume feature allows you to return registry settings and protected system files to a previously saved state - to one of the checkpoints that Windows creates automatically. The user's documents are not affected.
Regeneration points in the “tens” are created before installing programs, drivers, system updates, or simply once every 7 days. In addition, the user can create them manually.
Procedure
- Go to the Control Panel, open the “Recovery” applet and select “Run System Restore” from the list of commands.
- Select the checkpoint created before the failure and click Finish.
- While the task is running, the computer will restart. After 5-7 minutes, Windows 10 will return to the state that preceded the problem.
Resuming the system is also available when Windows 10 does not start. If the download fails, you will see the following instead of the welcome window:
By clicking the “Additional recovery options” button, you will be offered a choice of action. Here you need to click on “Diagnostics”.
After this, a familiar window will open asking you to select a control point. Follow the instructions and wait for the wizard to finish.
Restoring your computer to its original state
This option can help you deal with errors that System Resume does not resolve, or when appropriate checkpoints are missing or not created.
Restoring Windows 10 to its original state can be done:
- With saving user files and a number of pre-installed programs. In this case, all system settings, drivers and software installed by the user will be reset.
- Without saving personal data, programs and settings. This option returns the system to the state it was after a clean installation. There will be no user information left in it.
Important! On computers and laptops where Windows 10 was installed by the manufacturer, a third option may be available - restoring to factory settings. This deletes not only user data and settings, but also the contents of non-system partitions of the hard drive.
Returning to the factory state without saving personal information is used as a last resort - an alternative to reinstalling the system in case of intractable failures, as well as before selling the computer or transferring it to another user.
How to reset Windows 10 to its original state
- Open the Start menu and click the Settings button.
- Select Update & Security from the list of options.
- Next, select "Recovery".
- In the "Reset your computer" section, click the "Get Started" button.
- After that, select the option you need: “Keep my files” or “Delete everything”.
In about 40-60 minutes, Windows 10 will be up and running again.
Rollback to a previous version of the system (Windows 7 or 8)
This method is available only to those who installed the “ten” in the order of updating the previous OS - “seven” or “eight”. And it is possible only within a month after the update.
In this case, the user’s files in personal folders, drivers, software and settings of the previous system will be saved, and everything that was in Windows 10 will be deleted.
To roll back to the originally installed OS, launch the Settings application from the Start menu, open Update and Security, then Recovery and select Return to Windows 8.1 (7).
If this item is not in the list of parameters, then the function is not available. It will also be unavailable if the user has deleted the Windows.old folder from the system partition of the hard drive.
Reinstalling Windows 10 from a recovery disc
This option will be useful for those who have previously created a Windows 10 regeneration disk. It stores a backup copy of the system with working parameters.
To create a recovery disk, you must do the following:
- prepare a blank DVD or flash drive (the minimum storage capacity is determined individually) and connect to the computer;
- open the “Recovery” section in the control panel, select “Create a recovery disk” and follow the instructions.
The finished Windows backup media should be stored in a safe place and not used for anything else.
How to restore Windows 10 from a backup
If the system boots, open the Settings app -> Update & Security -> Recovery and Reset your PC. After rebooting into the recovery environment, select the “Diagnostics” and “System image recovery” sections.
Advice! If the system does not boot, you need to start the computer from the distribution disk, but instead of installing (Install now), select “Repair your computer”.
- Select the system image for the required number.
- If necessary, specify additional options, such as disk formatting.
- Confirm your consent to the rollback and wait for it to complete.
Windows will be automatically restored, saving user files, software and settings. The system state will be the same as when the backup was created.
Windows 10 boot repair
Resuming the Windows 10 boot loader is also performed by starting the PC from the Tens installation disc. 
- Follow the instructions bcdboot.exe X:\Windows, Where X:- letter of the system partition on the hard drive.
In the Recovery environment, partition letters often do not match those assigned in Windows. To determine them, you can use the console utility Diskpart from the system distribution. Type in the command line one by one:
Diskpart
List disk
Sel disk 0(or 1, 2, 3 - depends on where the bootloader is located, if there are several physical drives on the PC)
In our example, the boot partition is assigned the letter C, which means the recovery command is written like this: bcdboot.exe C:\Windows.
To fix boot failure on hard drives with MBR partitioning, you need to run 2 more commands in the console: bootrec/fixmbr And bootrec/fixboot. The boot partition code will be overwritten.
How to restore Windows 10 system files
To restore protected system files in Windows 10, use the application SFC.exe, launched on the command line with the parameter /scannow. Scanning and correction takes about 20-40 minutes.
When SFC completes, a report (CBS.log) will be generated and saved in the C:\Windows\Logs folder. From it you can find out which files were damaged and restored.